
Ever felt the need to search Google for images instead of words? Apparently, some searches are more suited to pictures than words. On that note, using Google Advanced Image Search can be extremely useful for online image searches, particularly when seeking a specific type of image for your needs. It is an excellent starting point to find the desired images you need.
What Is Google Advanced Image Search?
Google Advanced Image Search is an advanced feature provided by Google that enables users to refine their image searches using various criteria. This tool lets users specify parameters such as image size, color, file type, and usage rights. With Google Advanced Image Search, you can use size qualifiers, like small, medium, and large, to help narrow your search.
For example, if you search for “giraffe” with the size qualifier set to “large,” you’ll find larger images of giraffes. If you want to find pictures that are even larger than large, you can use the enormous option.
Why Do An Advanced Image Search?
Google Advanced Image Search can be a big game-changer if you are a website owner. Advanced Image Search is a feature that allows you to find images based on specific parameters, such as color, file type, and dimensions. It is an excellent tool for finding photos for your blog posts, marketing materials, or any other need.
However, You might already know that not all images on Google’s search result pages are identical. Some images may be copyrighted and shouldn’t be used without permission or attribution. And Google’s Advanced Image Search lets you quickly find public domain images you can use without attribution.
How To Use Google Advanced Image Search?
What about diving deeper into the ultimate guide for Google Advanced Image Search?
Let’s get started!
The main aim of Google Advanced Image Search is to find the exact image you want. Hence, to get started, follow the steps below!
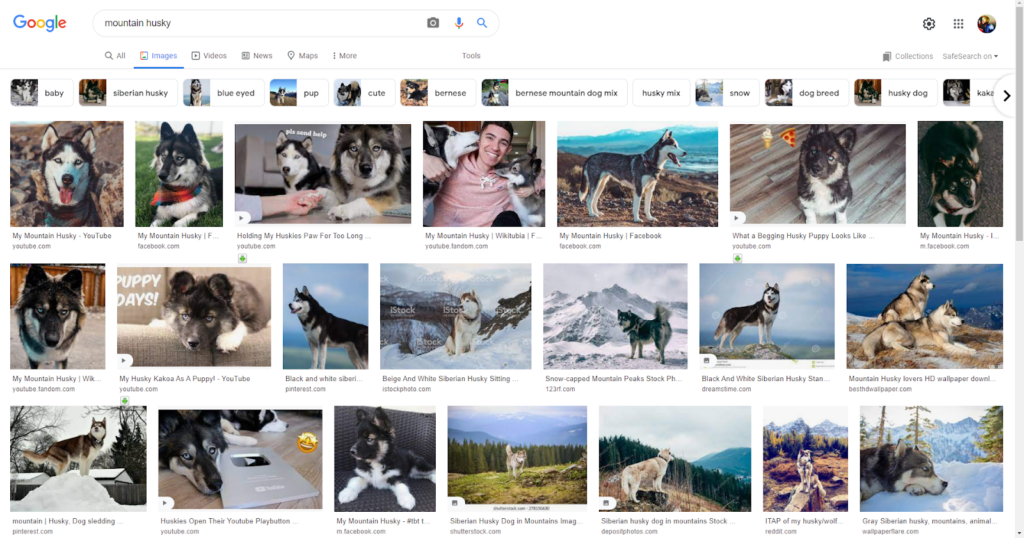
Step 1: Search For The Image’s Keyword You Are Looking For
The first step to using Google Advanced Image Search is to identify the keyword or phrase that accurately describes the image you are searching for. Start by brainstorming relevant keywords or phrases related to the image’s subject. Then, type these keywords into the search bar of the Google search engine.
Step 2: Switch To The Image Tab From The Search Results
After conducting your initial search using the keyword or phrase, you will be presented with a list of search results on the Google search engine page. Locate the tabs at the top of the search results page to switch to the Image tab and view image-specific search results. These tabs typically include options such as “All,” “Images,” “News,” “Videos,” etc.
Click on the “Images” tab for the dedicated image search results. By selecting the Images tab, Google will refine the search results to display images relevant to your initial keyword or phrase. This allows you to focus specifically on images and find visual content related to your search query. Switching to the Image tab helps streamline your search and allows you to explore various images for your desired keyword.
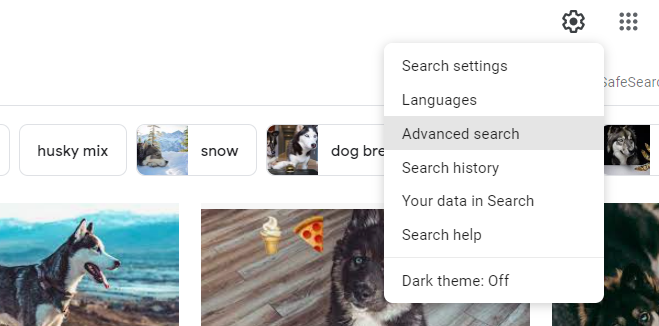
Step 3: Now, Click On The Settings Or Gear Icon From The Top Right Corner
Once you have switched to the Image tab and are viewing the image search results, you need to access the settings or gear icon to access further options for refining your search.
To locate the settings or gear icon, look toward the top right corner of the search results page. It is usually positioned near the navigation bar or alongside other icons. The settings or gear icon often represents a menu or dropdown options.
Click on the settings or gear icon to open a dropdown menu or a pop-up window that provides additional search options for customizing your image search. These options may include filters and settings, such as image size, color, usage rights, etc. These settings allow you to narrow your search results and find images that meet specific criteria.
Accessing the settings or gear icon is essential to utilize the advanced features of Google Advanced Image Search and refine your image search according to your preferences and requirements.
Step 4: Click The Advanced Search Option From The Dropdown Menu
Clicking on the “Advanced Search” option will take you to a dedicated page or an overlay window to access advanced search settings specifically designed for image search.
On the Advanced Search page, you will find a range of parameters and filters to further refine your image search. These parameters may include options for image size (small, medium, or large), image type (such as photos, clip art, line drawings, etc.), color, aspect ratio, and usage rights.
The dashboard includes the following options to help you filter the results:
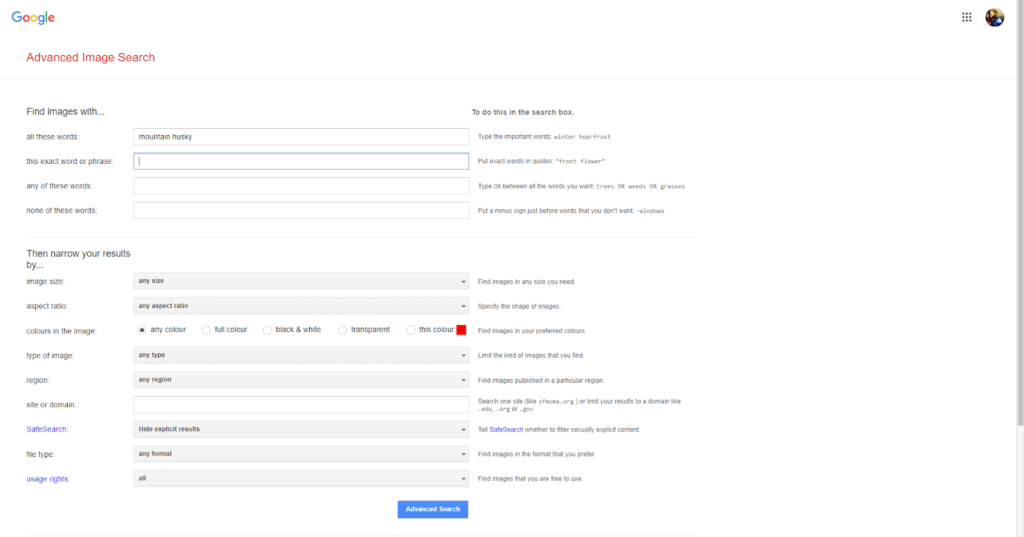
- Exact Word Or Phrase: This option works similarly to searching for an image with keywords. Just enter the complete word or phrase for what you are looking for. Example: Mountain Husky with blue eyes.
- Any Of These Words: You can use OR between words or phrases and do a broader search. Example: Mountain Husky or Blue Eyes.
- Image Size: Here, you can easily set your desired image size. You can select from small, medium, large, or massive, or choose to select images more prominent than a particular resolution—for example: larger than 640×480, larger than 800×600, etc.
- Aspect Ratio: Here, you can sort your image results on aspect ratio. You can select your images to be tall, broad, panoramic, or square.
- Image Color: Here, you can set your images in a particular color like yellow, red, etc., or you can even set your pictures in a specific shade like b/w, transparent, or full color.
- File Type: Want your images to be in a particular format? You can select your image format from JPG, JPEG, PNG, GIF, or more.
- Region: Here, you can select the images published from a particular country or region. For example, you may want image results only uploaded from San Francisco. Just choose San Francisco, and you’ll get what you want.
- Site Or Domain: You can limit your results to images only from a particular domain.
- Image Usage Right: You cannot use all the images freely in your content. You might have copyright strikes. Hence, this option can quickly help you sort images with creative or commercial licenses.
By selecting and adjusting these advanced search settings, you can tailor your image search to align with your requirements.
Wait! It’s still not over.
Reverse Image Search
Apart from such a superb filter option, there’s another great feature, especially for content creators.
It often happens with people who already have an image but cannot describe them enough to look for similar pictures. And here’s where Reverse Image Search comes into play!
Here you can find images similar to the ones you already have. You can also use this feature to find images you need for your blog posts without even caring about copyright strikes. Interesting, isn’t it?
To start to reverse search your images, simply follow the steps below!
1. Open Google Images
2. You’ll find a camera icon beside the search icon. Click on that.
3. You can paste a link or upload an image from your computer or smartphone.
4. Now click on search by image, and you’re done.
Here you can easily find the images related to your image and the additional text pieces of information.
Wrapping Up!
Whether a regular user or a content creator — advanced image search always helps you find the right image, you seek. It gives you the ultimate power to filter the images based on size, color, and other criteria. Hence, learning how to use this feature always properly becomes essential.
Here in this blog, we hope we have successfully helped you with the information you sought. But still, if you have any questions, we would love to answer them in the comments section below!


No Comments